- Details
- Category: Owner's Handbook
- Hits: 56765
Adjustment Of Clutch
Adjustment on New Machines. The clutch is correctly adjusted when a new machine is despatched from the factory, but during the running in period the friction linings and cable assembly may bed down and adjustment may be needed fairly soon.
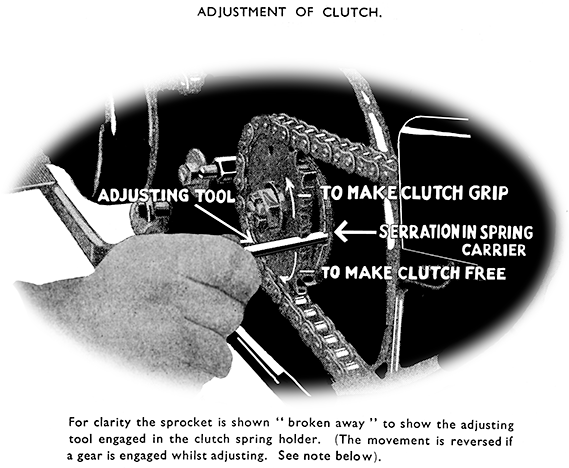
In the ordinary way and after everything has settled down the cable adjustment does not require alteration, and any wear upon the friction surfaces is taken care of by adjustment of the clutch spring holder only. Illustration page 43.
When new, however, the control cable casings tend to compress somewhat and the ferrules settle and although the bedding down of the friction surfaces decreases the play in the thrust bearing and would thus decrease free movement at the handlebar lever, the shortening of the effective lengths of the cable casings tends to mask this by having the same effect as a stretched cable.
It is, therefore, recommended that when the machine is checked over by the Dealer after the first five hundred miles running the adjustment should be carried out by follow¬ing faithfully the sequence of operations detailed later (page 44)
During the running in period, or if the clutch has been relined, or a new cable assembly fitted, keep careful watch on the clutch lever for any alteration in free movement, and also look out for clutch slip.
Readjust at the first sign of either.
Adjustment of Clutch. In normal working and except in circumstances stated above, adjust the clutch as follows :
Remove the front portion of the rear chain guard by taking off the two nuts holding it to the primary chain case. The guard is marked to indicate the need for its removal.
Insert the clutch adjusting tool through the hole in the sprocket, and with gears in neutral, move the rear wheel until the tool will engage in one of the notches in the edge of the clutch spring holder behind the sprocket. The tool is a ¼" diameter steel rod cut with a flat at one end. The flat allows the rod to clear the sleeve gear nut. See illustration, page 43.
To increase the freedom in the operating mechanism, that is to cure slip, turn the rear wheel forward until there is between 1/8" to 3/16" in free movement on the control cable at the handlebar end.
To decrease free movement, that is to make the clutch free sooner, turn the rear wheel backwards. Do not move the wheel more than about a quarter of a turn at once before removing the adjusting tool and checking the result of the adjustment.
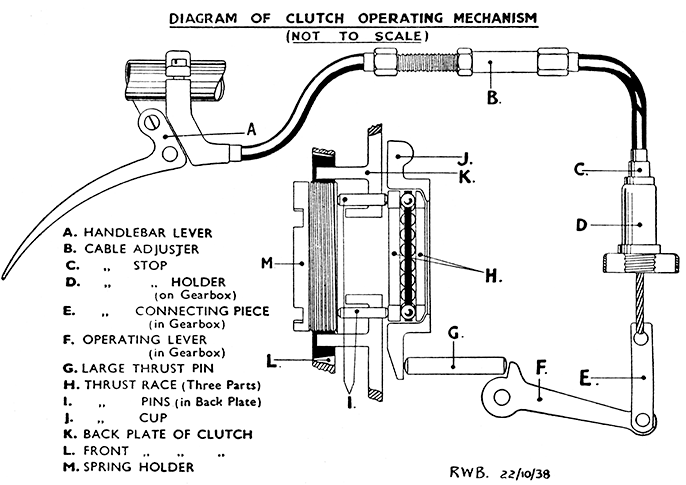
The midway cable adjuster is used only when fitting a new cable assembly or to compensate for the settling down of the cable assembly when new.
Note. - It has occasionally happened that due to neglect of the adjustment a clutch has reached such a condition that the clutch spring holder has refused to turn in the clutch front plate and carries the plate around with it, making adjustment in the ordinary manner impossible.
In such circumstances it is necessary only to engage one of the indirect gears, either second or third, after inserting the adjusting tool in the notch in the spring holder, and to pull the rear wheel backwards until the clutch grips again, when the gear should be disengaged and adjustment completed in the normal way.
By engaging an indirect gear before adjusting the clutch, the clutch front plate is caused to turn more rapidly than the sprocket, so that the spring holder which is for the time being keyed to the sprocket by the adjusting tool is forced to lag behind it, thus giving the relative movement needed between the spring holder and the clutch plate.
Adjustment of Clutch—Sequence of Operations. The following "drill" is recommended when the Service Check is made after the first 500 miles use, and should be followed if at any time it is not evident whether adjustment is needed to the cable or the spring holder or to both.
Operation 1. Fully slacken off the midway clutch cable adjuster and slip out the cable nipple from the handlebar lever. This is often made easier by removing the lever pivot pin.
Operation 2. Fully open the throttle and air controls. With the gears in neutral depress the kickstart against compression. If the clutch slips omit Operation 3 and carry on with Operation 4.
Operation 3. With the clutch adjusting tool engaged with the clutch spring holder as already explained, pull back the rear wheel a little at a time checking for clutch slip after each movement, being sure to remove the adjusting tool before checking. As soon as any slip can be detected, proceed with Operation 4. Only the slightest perceptible slip is required.
Operation 4. Refit the cable nipple to the handlebar lever and refit the lever if it was previously removed. Readjust the midway adjuster to take up all play in the cable. Do not force the adjuster, but only just remove all play. Tighten the adjuster lock-nut.
Use the adjusting tool again, and pull the rear wheel forward a little at a time until the cable can move freely in its casing for 1/8 to 3/16".
The adjustment is now completed and any further adjustment should be made to the spring holder only. The cable adjuster is unlikely to need further attention.
The following will help if the owner is doubtful what adjustment to make :
Symptom : Clutch slipping. No freedom on control cable.
Remedy : Readjust spring holder forward (anti-clockwise)
Symptom : Clutch slipping. Normal or excess freedom on control cable.
Remedy : Carry out Operation 4 of adjustment "drill."*
Symptom : Clutch dragging (failing to free). Normal or excess freedom on control cable.
Remedy : Carry out the full adjustment drill. Operations 1 to 4.
Symptom : Clutch dragging and also slipping under load.*
Remedy : Carry out Operation 4.
If clutch trouble cannot be eliminated by any of the methods described above it will have to be dismantled to attend to some mechanical fault, and for new parts to be fitted where required.
* In case the slip is excessive and prevents adjustment in the normal manner refer to note on page 43.


