- Details
- Category: Owner's Handbook
- Hits: 2938
Chains
Maintenance. Neglected chains will cause harsh and snatchy running and apart from making the machine unpleasant to ride, will wear out quickly.
The adjustment should be checked every 1,000 miles and lubrication attended to. The chains will not necessarily need such frequent adjustment, but if checked regularly they are unlikely to be allowed to run dry or out of adjustment.
Squirt some oil over the primary chain from a force feed oil can used through the inspection cap hole after removing the small cap (Illustration, page 34). Move the chain forward with the kickstart whilst oiling. Occasionally drain the case and refill with engine oil (1/8 pint of Viscosity S.A.E. 50 oil).
The rear chain should be removed for cleaning and re-lubricating when this becomes necessary. The amount of attention will depend upon the conditions of use. To remove the chain, move it round to find the connecting link, disconnect and run the chain off the sprockets.
Soak the chain in paraffin brushing off all dirt. Several changes of paraffin may be needed to clean a really dirty chain properly. When clean hang up to drain.
Re-lubricate by soaking the chain in molten, but not boiling grease or tallow, preferably with graphite. Move the chain about to work the grease into the bearings.
When the grease cools off and begins to set remove the chain and wipe off all surplus grease from it.
Refit the chain to the machine and when fitting the connecting link note that the spring clip must be fitted so that the closed end faces forward in the direction that the chain runs.
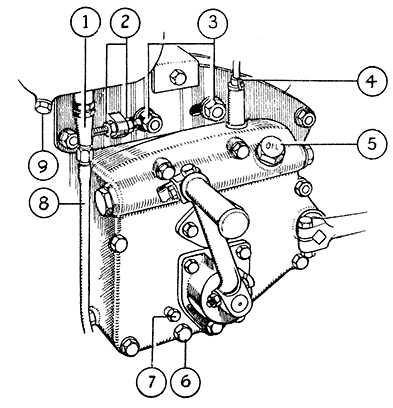
| (1) | Ball Valve Assembly | (6) | Gearbox Oil Drain Plug |
| (2) | Chain Adjuster Nuts | (7) | Gearbox Oil Level Plug |
| (3) | Gearbox Mounting Bolt Nuts | (8) | Engine Oil Feed Pipe |
| (4) | Clutch Cable Stop | (9) | Oil Tank Drain Plug |
| (5) | Gearbox Oil Filler Plug |
Adjustment of Primary Chain. Illustration, page 51. The chain must be adjusted to allow ½-in. free up and down play between the sprockets. Remove the inspection cap (see Illustration, page 34) to check. Do not attempt to check when the chain is in motion.
The amount of free play may vary in different places so that it should be checked in several different positions by turning with the kickstart between checks. The full ½-in. movement must be allowed in the tightest place.
To adjust, slacken off the three gearbox bolt nuts (3). One is underneath and not seen in the illustration.
Tighten the chain by screwing the front adjusting nut (2) forward on the adjuster, and the screw the second nut forward against the stop to draw the adjuster back. When the correct chain tension is obtained tighten the gearbox bolt nuts and re-check the adjustment. If correct screw back the front adjuster nut hard against the stop.
To slacken the chain screw the rear adjuster nut away from the stop and then move the front nut back along the adjuster and hard against the stop.
Adjustment of Rear Chain. On all spring frame machines irrespective of make there is slight variation in chain tension when the rear springing is working, due to the rear swinging fork pivoting from a point slightly behind the driving sprocket centre. The chain is tightest when the swinging fork is in mid position. (Suspension units compressed to 11½-in. centres. See illustration, page 71). In this position the chain must have ½-in. free up and down play midway between the sprockets.
It is easier however to adjust the chain with the swinging fork at its lowest position which it will reach if the machine is supported on the stand and the rear wheel allowed to hang
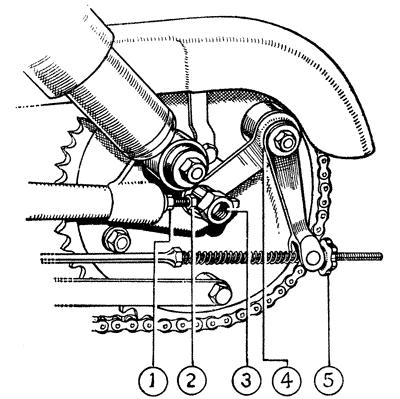
REAR BRAKE AND REAR CHAIN ADJUSTMENT.
| (1) | Chain Adjuster Lock Nut. |
| (2) | Chain Adjuster. |
| (3) | Rear Brake Plate Locking Bolt Nut. |
| (4) | Rear Brake Cam Felt Washer. |
| (5) | Rear Brake Adjusting Nut. |
down with the tyre clearing the floor. Be sure the floor is level when doing this work. In this position the chain must have 1¼-in. free movement, which will become reduced to ½in. in the mid. position. Note that in normal working the swinging fork does not reach such a position, and the variation in chain tension over the normal working range is very slight. Slacken the wheel spindle and the brake plate locking bolt nut (3, Illustration, page 53).
To tighten the chain slacken the adjuster lock-nuts (1) and screw both adjusters (2) out of the fork ends an equal amount to force back the wheel. Check the adjustment, and turn the rear wheel between checks to ensure that the full freedom is allowed in the tightest place as was explained previously when dealing with the primary chain.
Tighten the adjuster lock-nuts when the adjustment is finished, and tighten the wheel spindle and brake plate locking bolt nut. Keep the spindle and brake plate locking bolt pressed forward against the heads of the adjusters when tightening.
To slacken the chain the adjusters are screwed into the fork-ends and the wheel pushed up against them before tightening.
By turning the adjusters an equal amount, which can be checked by counting the flats of the hexagons when turning them, the wheel alignment will be kept correct


