- Details
- Category: F62-1R Service Manual
- Hits: 611
REFITTING CLUTCH HOUSING AND GEARBOX TO ENGINE
Refitting Clutch Housing.
This must be fitted before the gearbox is put back. See that the reduction gear plate is firmly fixed with the nuts and bolts properly tightened, and the reduction gear oil pipe banjo bolts to the reduction gear plate and crank¬case respectively, are secure.
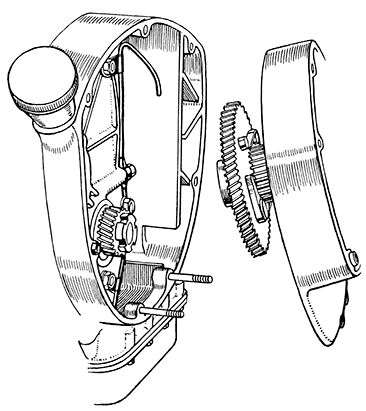
Set the top end of the pipe outwards well proud of the joint face (Fig. 35). Repairers doing a lot of Velocette repair work should get a scrap clutch housing and cut it away at the top to expose the recess and oil hole above the reduction gear shaft bush. With this mounted in place tem¬porarily the end of the pipe can be adjusted accurately to deliver oil into the oil hole.
Having set the pipe fit the two dowels into the counterbored stud holes. Smear the crank case joint face with grease and fit a new gasket to it. Register the holes in the gasket with those in the case.
Offer the clutch housing assembly to the crankcase, tipping it slightly forward to allow the large reduction gear to pass under the oil pipe.
Level it up after the gear is past the pipe and locate the two bottom stud holes over the studs (these are clearly shown in the sketch). Press forward gently, pushing back the oil pipe into the recess and, when right up to the crankcase face, fit the washers and nuts to the studs and tighten the latter just enough to hold the housing to the case. They will be tightened fully later.

FIG. 35
Small Oil Pipe bent well outwards (see above), Clutch Housing tipped so
that reduction gear misses end of pipe. Push forward and bring clutch housing
upright to engage holes over two lower studs.
Refitting the Gearbox Assembly.
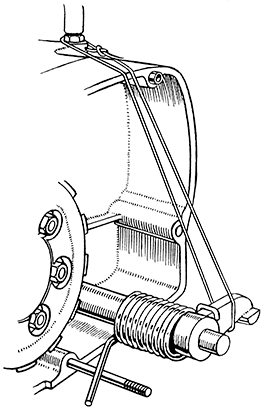
Leave the starter spring free, and pull up the operating end of the starter shaft as far as it will go, turning the crankshaft by rotating the clutch, and fix it with a piece of stout cord or a suitably bent wire with a hook at each end (Fig. 36). Arrange the loop of the spring over the lever as shown and hook the other end over the stud.
The clutch plates must have been lined up accurately. For this Service Tool LET791 is essential (Fig. 17), see page 23.
Fit the two dowels over the studs in the counterbored holes. Offer the gearbox up into position with the clutch bell opposite the plates and set so that they will slide into it up the slots. Push the gearbox forward over the studs. Do not use excessive force. If it will not go on with reasonable pressure it is almost certain that the clutch plates have not been properly lined up or the bell requires turning a little to bring it into line.

FIG. 36
Fit the Starter Spring as indicated, and tie the arm with string to the breather pipe union to hold it against the spring.
Leave a gap of about ¼-in. between the faces of gearbox and crankcase and by working through the gap press the leg of the spring upwards and on to the boss of the stud on which it was resting. A small screwdriver is suitable for the purpose. Remove the cord or wire and push the gearbox home fully.
Fit the five washers and nuts and tighten fully. Also tighten the two nuts at the bottom of the clutch housing. They were left loose when the housing was fitted.

