- Details
- Category: MAC Owner's Handbook 1955
- Hits: 1271
The Carburetter
Maintenance.
It is inadvisable to tamper with the carburetter if the machine is running satisfactorily, but occasional adjustment of the control cables and cleaning out may be required.
The movement of the twist grip or air lever should cause immediate movement of the appropriate valve with as little lost motion as possible, and of course the controls must be
adjusted to allow full closure. The throttle is provided with its own adjustable stop which is independent of the cable adjuster and when adjusting the cable this stop should be set to the slow idling position as explained later.
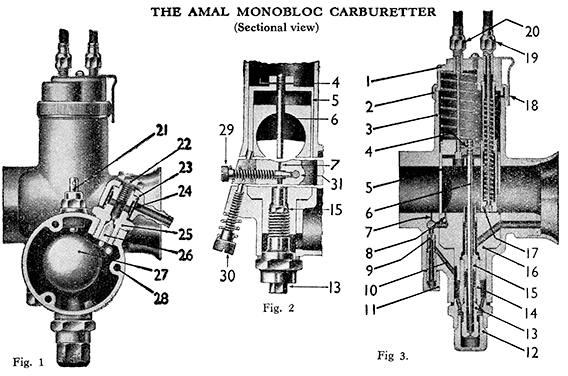
To take out lost motion from the controls screw the cable adjuster anti-clockwise out of the mixing chamber top (Fig. 3).
Symptoms which indicate that the carburetter needs cleaning are : difficult starting, explosions in the silencer on closing the throttle after fast running, and a tendency for the engine to stall in traffic when idling.
Petrol Feed (Verification).
(Fig. 1.) Remove the filter gauze by unscrewing the banjo bolt (22) from the carburetter, and pulling the banjo clear of the needle seating (25). See that the gauze is undamaged and free from foreign matter. Before replacing the gauze and banjo turn on each petrol tap momentarily one at a time and see that the fuel gushes out. If the flow is restricted from either tap remove the tap from the tank and clean the strainer. Also verify that the vent hole in tank cap is clear.
Petrol Feed (Flooding). (Fig. 1.)
This may be due to impurities from the fuel getting on to the needle seating, and can be remedied by cleaning the needle, seating, and float chamber periodically until the trouble ceases. On old machines a worn float needle (26) or leaking float (27) might be responsible.
Removal of Needle. (Fig. 1.)
Turn off the fuel at both taps and remove the banjo (23). Unscrew the needle seating (25) from the carburetter body and lift out the needle.
Removal of Float.
Take out the three screws securing the side cover to the carburetter body and take off the cover.
Lift the float sideways off the hinge pin. If the float is leaking it will be possible to hear the fuel washing about inside it if it is held close to the ear and shaken. Renew if needed.
When refitting the float see that the narrow leg portion of the hinge is uppermost as this operates the needle.
Care must be taken to see that the joint faces of the side cover and body are not damaged or bruised, and that the joint gasket is in good condition, otherwise there will not be a fuel-tight joint.
Explosions in the Silencer may be caused by too weak a pilot mixture when the throttle is closed or nearly closed, or by too rich a pilot mixture and an air leak in the exhaust
system. In both cases the mixture has not been fired in the engine cylinder but has been ignited in the silencer by heat from a later charge that has fired. Clean the pilot system to
eliminate the trouble.
If it happens when the throttle is fairly wide open it will be found to be due to ignition faults and not carburation. (See sections dealing with the magneto and sparking plugs).
Removal of Pilot Jet. (Figs. 2 and 3.) Remove the pilot jet cover nut (11) and unscrew the pilot jet (9) from the carburetter. Clear by blowing out, and also blow the pilot outlet (7) and pilot by-pass (8) openings clear. When clean reassemble.
Removal of Jet Block, etc. (Figs. 2 and 3.)
Close the throttle and air controls. Unscrew the mixing chamber cap (2) and pull the throttle and air valves with cables and mixing chamber top (1), etc., out from the top of the mixing chamber.
Unscrew the jet holder (14) from the carburetter. This has the larger hexagon head of the two below the carburetter.
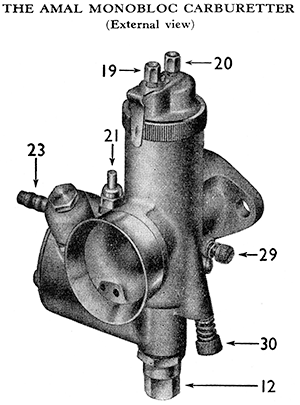
The needle jet (15) is screwed into its upper end and the main jet (13) into the other. The main jet is of course accessible without taking out the jet holder, as removal of the main jet cover (12) will permit a spanner to be applied to it, and it can be screwed out of the jet holder.
Unscrew the throttle adjusting screw (30) right out and the jet block (16) will push out upwards from the carburetter body (2).
Reassembly.
See that the gasket on the bottom of the jet block is in good condition, otherwise fuel will leak across its face and cause erratic running due to mixture richness. If
faulty fit a new gasket.
When replacing the throttle valve see that the jet needle (6) goes into the centre hole in the jet block and, once in, note that the throttle works freely when the mixing chamber cap is screwed down and held by the spring (18).
Adjusting the Carburetter.
There is generally nothing to be gained by varying the jet and needle settings from standard except that after very prolonged use the needle jet may become worn and enrich the mixture over much of the range of throttle opening. In such circumstances the needle can be detached from the throttle valve and replaced with the clip in the next higher groove. Normally the needle clip is in the middle groove. Screw the pilot air bleed screw (29) fully home, and then reset it out again one and a half turns. Start the engine and
after it has warmed up a little set the throttle stop screw (30) so that the engine runs too fast for idling with the twist grip closed.
Gently screw out the stop screw until the engine slows down and begins to falter, and then adjust the pilot air bleed screw in or out a trifle to make the engine run regularly and faster. Gently screw out the stop screw a little more until the running is slower and faltering occurs again. Now adjust the pilot air bleed again to get the best slow running.
If this second adjustment makes the engine run too fast go over the job again.
Avoid an over-rich pilot setting as this will cause heavy fuel consumption, particularly if much running is done at small throttle openings.
Erratic slow running may be due to air leakages, or if a large mileage has been covered, to a worn throttle valve.


