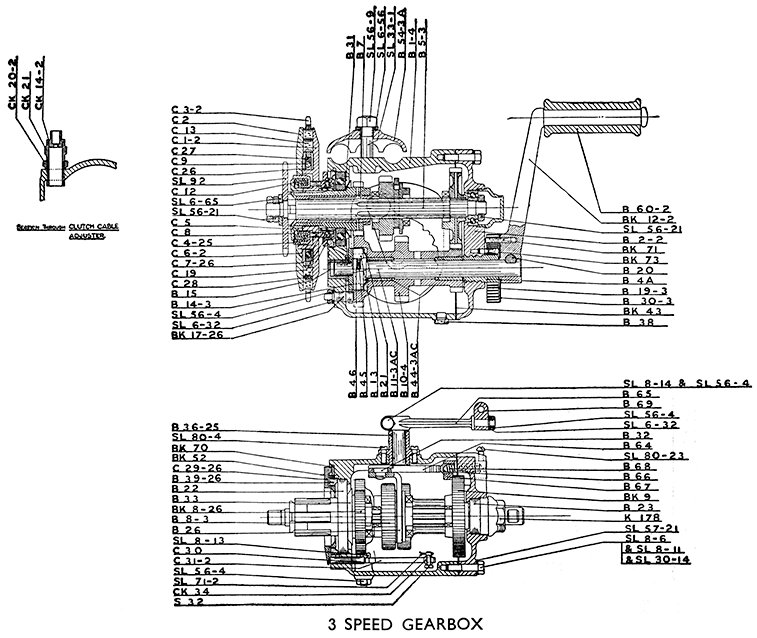
- Details
- Category: F40/5R GTP Instruction Book
Dismantling The Gearbox (Three-speed Only)
Note.—It is not advisable to remove gearbox from frame until the former is dismantled as difficulty may be experienced in holding it.
First remove kick starter crank by unscrewing nut on kick starter crank cotter and tapping out same. Then turn kick starter pedal round twice anti-clockwise (this unwinds spring) and withdraw kick starter crank and clock spring cover taking care that spring remains in cover, otherwise difficulty may be experienced in rewinding the spring.
Should it be necessary to rewind spring, place same on peg in brass end cover, then place crank on kick starter shaft and fully wind by turning crank until spring is fully wound. Tie wire round spring. It may then be re-inserted in cover and wire withdrawn.
Remove the brass cap covering the end of the gear shaft, remove the nut on the end of the gear shaft with a box spanner. Loosen the screws holding the end cover. The end cover can then be taken off. It is well to place a tin to catch the oil which will run out unless it has been previously drained off. Remove the driving chain and withdraw the shaft. The middle gear, the layshaft, and the low gear, are then all free to be removed for inspection. Provided that the gears are not badly worn, there should be very little requiring attention. The kick starter should be examined. To remove the sleeve gear the clutch will have to be taken off. See " Dismantling Clutch." The gear can then be very lightly driven out of its ball bearing. Take care not to damage the thread. See that the springs and pegs which push the kick starter rollers into action are in good order.
Reassembling. First replace the sleeve gear and see that the oil thrower washer is on correctly with the concave side turned towards the gear, then place the middle gear in the sliding fork. (The groove in the middle gear for the selector fork should be nearest the gearbox end cover). Then thread the driving shaft through it. Now place the kick starter shaft with the rollers, springs, pegs and the kick starter cam into the layshaft. The cam should be fitted to the kick starter shaft so that the tongue projects on the opposite side of the kick starter shaft to the slot for the crank cotter. This can now be placed into position in the gearbox, taking care that the kick starter cam comes in the correct position with the peg at the back of the gearbox. This is correct when the slot for kick start crank cotter pin is on the top of kick start shaft.
The low gear wheel can now be placed into position, and then the cover replaced, and the screws tightened up. Next, the lock nut on the end of the gear shaft should be tightened up with a box spanner after which the small brass cap should be replaced. Take the kick starter crank with the spring in the cover and slip it on to the shaft, see that the pin on the brass kick starter bearing enters into the hole in the spring, now wind the crank round twice anti-clockwise to put some tension on the spring, put the cotter in and drive home, replace washer and nut.
Fill the gearbox with oil as described on a previous page.
Kick Starter Slipping (Three-speed Only). This can be remedied by fitting a pair of oversize rollers. The rollers in full engagement should have a travel of 1/8" from their base, and not more. The standard size is .385 in.
Gear Slipping Out (Three-speed Only). Control rod requiring adjustment. Provision has been made for this at the lower end of the control rod. It is correct when the space between the gear lever and ends of the slot in the gate are the same for top and bottom gears. Should the dog clutches be worn they will require replacing. Gears in some cases can be re-ground on the dog clutches.
Changing Sprockets for Different Ratios (Three-speed Only). Special care has been taken to make this easy. Only one nut and locknut has to be removed when the sprocket can be pulled off; it only takes two or three minutes and no special tools are required.
|
Gearbox |
" G.T.P." GEAR RATIOS (3-Speed Gearbox) |
||
|
Top |
Middle |
Bottom |
|
|
*19 |
5.6 |
8.1 |
14.21 |
|
20 |
5.33 |
7.7 |
13.5 |
|
21 |
5.076 |
7.3 |
12.86 |
|
22 |
4.845 |
7.0 |
12.27 |
(*This is the smallest sprocket that can be fitted).


